Introduction
Hey there, fellow home gardeners! Today, we’re going to dive into the world of potato sprouting. Some also like to call it, potato chitting. Imagine we’re having a cozy chat over a cup of tea, and I’m about to unfold the secrets of getting those potatoes ready for the garden. But remember, we’re only talking about sprouting here. We’ll save the planting and growing for another day.
Section 1: Understanding Potato Sprouting
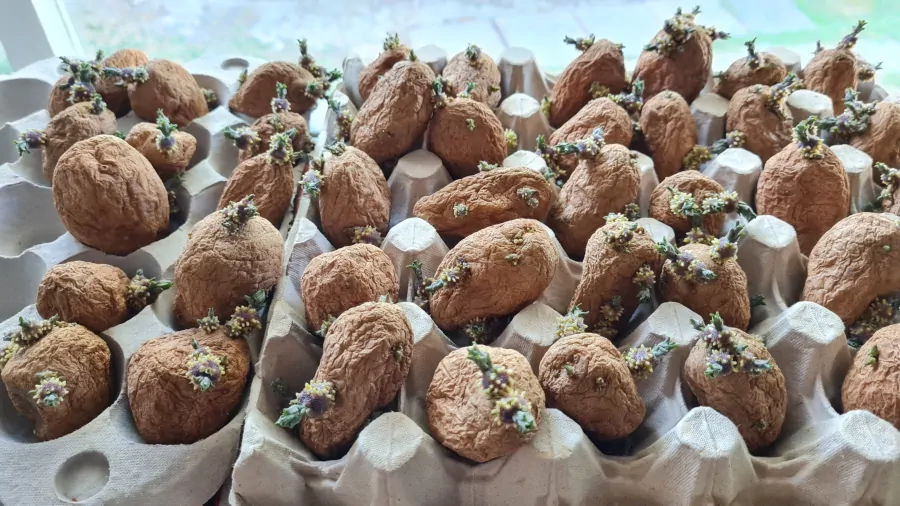
So, what exactly is potato sprouting or chitting? It’s simply the process of getting your potato tubers to start growing those little sprouts indoors before you plant them outside. This step is super important for the potato planting season because it gives your potatoes a head start. By the time you plant them, they’ve already got tiny shoots, ready to burst into growth when they hit the soil.
Potato chitting is especially crucial in regions with short springs and long, hot summers. The right timing for chitting depends on your local climate. In warm areas, you might start in January and plant in March, while in cooler climates, you might start in February and plant in April or May. The goal is to plant the potatoes about 2–4 weeks before the last frost date, giving them a 4–6 week head start with chitting. It’s also important to ensure the soil temperature is at least 40 degrees Fahrenheit for optimal growth.
When it comes to types of potatoes, there’s a variety to choose from. Cara seed and Kennebec potatoes are popular choices, each with their unique characteristics and growing habits.
Section 2: Choosing the Right Potatoes
Selecting the right potato tubers for sprouting is crucial. You want healthy, disease-free seed potatoes. While you might be tempted to use those sprouting potatoes from your kitchen, they’re often treated with chemicals to inhibit sprouting and may not perform well in your garden.
The key is to look for potatoes that have already started to sprout slightly. These are prime candidates for chitting. You’ll often find a variety of potatoes suitable for chitting, like Cara and Kennebec, each with its unique flavor and texture. Cara potatoes, for instance, are known for their excellent yield and disease resistance, while Kennebec potatoes are prized for their versatility and flavor.
For more detailed insights into the process of potato chitting and the types of potatoes best suited for this, you can check out the informative articles on RusticWise and Nurseries Online.
Section 3: Getting Started with Potato Chitting
Getting your potatoes ready for the big grow is exciting! Here’s a simple, step-by-step guide to get you started on potato chitting. This process is crucial for a successful potato crop season, so let’s make sure we get it right.
- Inspect Your Potatoes:
Choose Cara seed or other potato tubers with a few eyes (buds). The ‘rose end’ of the potato, which has the most eyes, should face upwards. - Proper Storage:
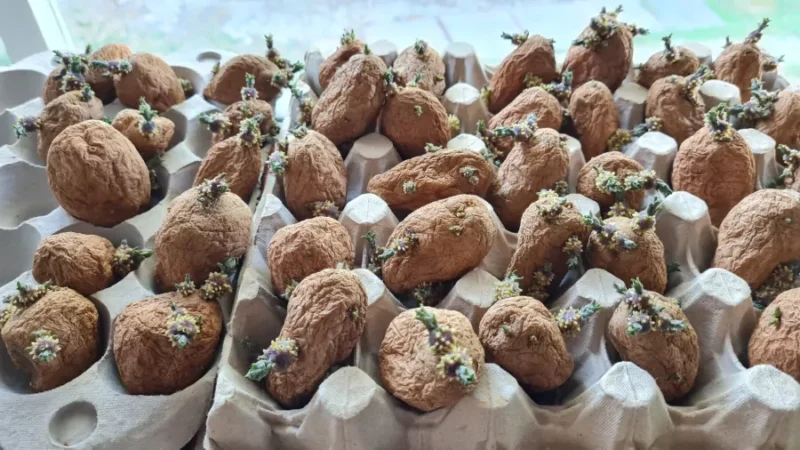
Place your potatoes in a single layer in a shallow box or an egg carton. Egg cartons work great as they hold each potato in place. - Ideal Location:
Find a cool, frost-free room with moderate sunlight. Too much warmth and lack of light can lead to weak, pale sprouts. - Patience is Key:
Wait for 4–6 weeks. The shoots should be about 2 inches long. For early varieties, you might want to rub off all but the four strongest shoots.
For more detailed information, check out RusticWise, which offers a comprehensive guide on the potato chitting process.
Section 4: Creating the Perfect Environment for Sprouting
Now that your potatoes are all set for sprouting, let’s talk about creating the perfect environment for them.
- Light:
While potatoes can sprout in the dark, they tend to produce long, weak, and white shoots. Instead, aim for a place with filtered or indirect light. - Temperature:
Keep the potatoes in a cool, but not cold, environment. This is vital for encouraging strong sprout development. - Humidity:
Make sure your storage area is dry. Excess moisture can lead to rot, which is not what we want for our potato sprouts. - DIY Solutions:
If you don’t have an ideal spot, you can create one! Use a spare room or a part of your garage, and set up a simple shelving unit with some indirect lighting.
Remember, the care you take in this step greatly influences the growing time for your potatoes. For further insights into creating the ideal sprouting environment, Nurseries Online provides practical tips and tricks.
By following these guidelines, you’re setting up your potato crop for success. Good luck, and happy chitting!
Section 5: Monitoring Your Sprouting Potatoes
Caring for your potatoes during the sprouting phase is a gentle art. Here’s how to ensure they’re sprouting healthily:
- Check for Sprout Growth:
Look for sprouts that are about 2 inches long. This indicates healthy growth. - Avoid Over Sprouting:
If the sprouts get too long, they can become weak and easily damaged. Aim for short, sturdy sprouts. - Watch for Signs of Disease:
Keep an eye out for any signs of rot or disease. Healthy sprouts should be firm and free from discoloration. - Rotate Regularly:
Gently rotate the potatoes every few days to ensure even sprout growth.
This careful monitoring is essential before you move on to plant with potatoes. For more guidance, RusticWise and Nurseries Online offer detailed insights into the care of sprouting potatoes.
Section 6: Timing is Everything
Timing in potato sprouting is crucial. Here’s a general timeline:
- Chitting Duration:
Typically, 4–6 weeks of chitting is sufficient. - Connection with Growing Time:
This preparatory period directly affects the overall growing time for potatoes. Well-chitted potatoes have a head start, leading to an earlier and potentially larger harvest. - Importance in Potato Crop Season:
Timing your sprouting to coincide with the right planting dates is crucial for the success of your potato crop.
Conclusion
To wrap up, we’ve covered the essentials of potato sprouting, from selecting the right tubers to creating the perfect sprouting environment and monitoring their progress. Remember, the effort you put in now sets the stage for a successful potato crop season.
Stay tuned for our next article, where we’ll dive into the world of planting and growing these sprouted beauties. We can’t wait to hear about your potato sprouting adventures and look forward to seeing you again for the next step in our potato journey! Happy sprouting!
Discover more about potato sprouting on RusticWise and Nurseries Online for additional tips and expert advice.
Additional Tips and Tricks
Here’s some motherly advice on potato sprouting that I’ve learned over the years:
- Patience is Key:
Sprouting potatoes isn’t a race. Give them time to develop strong, healthy sprouts. - Gentle Handling:
Once they start sprouting, handle your potatoes gently to avoid breaking the sprouts. - Variety Fun:
Experiment with different varieties like Cara and Kennebec potatoes. Each has its own unique characteristics and flavor. For instance, Cara potatoes are known for their excellent disease resistance, while Kennebec potatoes are versatile and great for a variety of recipes. - Anecdotes:
I remember my first time sprouting Kennebec potatoes. I was so anxious to see the sprouts that I checked them every day! When they finally sprouted, it was incredibly rewarding.
Potato Sprouting FAQs
Question:
How long should I chit my potatoes?
Answer:
Typically, 4-6 weeks is enough. However, this can vary depending on the variety and your climate.
Question:
Can I use store-bought potatoes for sprouting?
Answer:
It’s best to use certified seed potatoes as they are disease-free. Store-bought potatoes might not always yield the best results.
Question:
When is the best time to start sprouting potatoes for the potato crop season?
Answer:
This depends on your local climate. Generally, start chitting about 4-6 weeks before you plan to plant them, which is usually after the last frost date.
Question:
Is there a difference in sprouting Cara potatoes compared to other varieties?
Answer:
The sprouting process is similar across different varieties. Just remember some varieties, like Cara, may have specific characteristics like better disease resistance.
Closing Remarks on Potato Sprouting
That’s a wrap on our potato sprouting journey! I hope these tips and insights help you on your way to a bountiful potato crop. Remember, gardening is a learning experience filled with trials, triumphs, and lots of dirty hands.
Stay tuned for our next article on planting and growing these sprouted wonders. Until then, happy gardening, and don’t hesitate to share your potato sprouting stories with us!

